
Take a look at our newest crafted guide to find out all you need to know about screen printing.
Screen printing is both fun and practical- you can create usable art and crafts. Despite what many people think, it is actually really easy to do, as long as you have the right guidance.
In this guide, you will have access to knowledge so that you will know precisely what screen printing is & how to do it.
What is Screen Printing?
Screen printing is a great way to expand your creativity. It allows you to print designs onto clothing, fabric, material, paper, and many other surfaces. You can also check tattooing101.com which gives a guide to the best jobs for artistic people
What is Silk Screening?
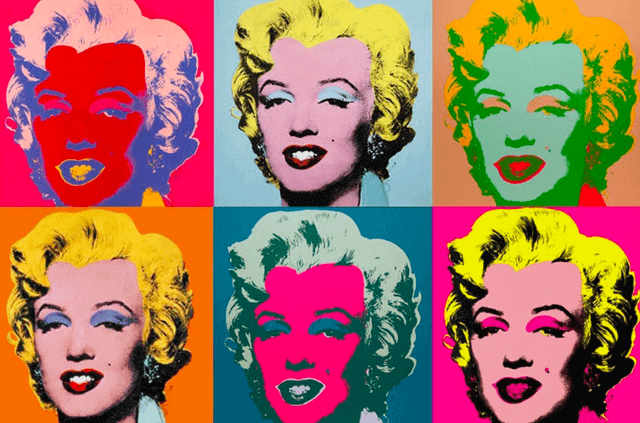
Screen printing is also commonly known as silk screening. This art and craft have been utilized by some of the most influential artists of the last century.
Andy Warhol is just one artist that made use of this technique to produce his most iconic art piece, the pop images of Marilyn Monroe. Those images went on to become a definitive feature of not only Andy Warhol, but of the pop art faze as well.
Do you have a wardrobe full of boring clothes, specifically T-shirts, that could use a bit of sprucing up? Why not haul them out and give them a makeover with screen printing.
You can make posters with your very own artwork or, if you are looking to redecorate your home, you can even use laser transparencies and screen printing to print your own wallpaper.
How Does It Work?
The screen printing technique is surprisingly simple. The ancient artists in China invented this art form around 200 AD, and although the technique has become sophisticated, it is still as simple as ever.
Large companies make use of complicated machinery, and this helps them to mass produce their products and designs. However, for a DIY project, you won’t need to worry about any high tech equipment.
Basically, the process involves transferring your selected image onto the material or surface using stencils and ink. The Stencil is placed on a frame that has a woven mesh and is then covered.
The ink is then transferred onto your fabric. This occurs because the negative space in the stencil, the open areas, or areas that have been cut out, allows the ink to pass through.
The positive space of the stencil, the solid part, will be a type of barrier. This barrier ensures that no ink will pass through, and so your desired image can be transferred.
One crucial factor is that the framed wire mesh has to be fine mesh. In order to get the ink through the mesh, a tool such as a squeegee sponge is used.
With the tool, the pressure is applied so that the ink passes through evenly across the stencil. After the removal of the stencil and the frame, you will be left with the image on the material.
Does this sound a bit complicated? Don’t worry, we will walk you through it step by step:
The Equipment you will Need
– Printing screen
– Ink/paint
– Tape
– Stencil
– Squeegee
– Iron
– Cutting mat
– Craft knife
– Pencil or pen
Printing Screen
A printing screen is a fine mesh material that has a wooden frame around it. You can find affordable and ready-made printing screens online or at your local craft store.
Screen Printing Machine
Instead of using a printing screen, you could also use a printing machine. However, the printing machines do cost a fair amount more than a printing screen. But, having a ready-made machine such as a printing machine will ensure that you have the best quality end results, so it depends on the outcome you want. This is a good option for people who are planning on doing a high volume of prints, and who need consistent quality.
Inks & Paints
The surface that you will be printing on will determine whether you need to opt for paints or whether you should opt for inks.
T-Shirt Printing
A T-Shirt should be used with fabric paints. This type of paint is the most affordable option and is readily available as well. However, fabric paints are more suitable for hobbyists and enthusiasts but are not an appropriate option for those planning on doing a larger volume of printing.
If you use textile paint, remember that you will need to allow it time to dry after it has been applied. After that, you will need to use heat to lock in the color. A household clothing iron will do this job just fine. Remember first to iron the reverse side of the T-shirt.
Wash the print screen while it is still wet with the paint so that the paint does not stay on the screen.
You also have a second option when it comes to T-Shirt printing. You can use Plastisol inks. These inks are used by larger companies who are screen printing on a larger scale. They are simple to use and give the finished product an opaque finish.
This is because the ink does not penetrate; instead, it remains on the top of the material. However, because Plastisol inks are made with thermoplastic particles, the end printed product will need to be heat cured at a high temperature of around 320 Fahrenheit.
If you have a design that is small and detailed, then you may consider using Plastisol inks. These inks are also available as puff ink, glitter, and metallics. You can also scrape off any paint that you don’t need rather easily since this ink does not air dry.
Screen Printing on Paper
For printing on paper, you can use water-based inks. These inks are easily purchased from most craft stores and are mostly affordable as well. You will have a large variety of premixed colors to choose from as well. Water-based inks will air dry relatively rapidly and will not be absorbed into the paper. All types of paper surfaces can be used as well as cardboard, textured papers, and even handmade paper.
Acrylic Paint
This paint can be used; however, it should not be on the top of your list. It is not as simple to use as the other paints and inks; however, when it is used correctly, it can produce high-quality results. Acrylic paints are cheap and can be fun to work with- but only if you are not particular about the outcome. This is because they are thick to use, and you can end up with an unpredictable finished product.
How to Screen Print
Once you have your chosen materials, you can begin:
1. Organize your tools and ensure that they are clean and ready.
2. Have your stencil prepared.
3. Place the stencil flat on your surface (T-shirt, cloth, etc.) with precision. To help you, tape down the corners so that it does not wiggle or move.
4. Ensure that your material is smooth. This is important because wrinkles in your material could result in unpredictable end results. Also, ensure that the stencil is in a perfect position.
5. Place the print on the surface that you are transferring the image onto.
6. Use masking tape on the underside to block any paint or ink run-off into spaces between the stencil and the screen edges.
7. Take your paint and pour it thickly across the top section of the stencil. Starting at the top, use your squeegee or similar tool to spread the ink across, down towards you. You need to have enough ink so that the entire design has an even coat. Check to make sure, and pour a second coat if need be.
8. Use the rubber ‘blade’ part of your tool and scrape down towards you. Be firm and apply pressure.
9. Drag in the opposite direction Using the same manner and tool.
10. Continue the process, but using only upwards and downwards stroked until the coverage is complete.
11. Clean excess ink or paint from the frame and then remove the frame.
12. Lift the stencil with a rapid upward movement.
13. Allow the paint to dry.
14. Remember to use heat curing if you are printing on fabrics. Use wax paper to protect the design when ironing.
15. Clean your equipment as soon as you are finished to prevent stains.
Conclusion
One of the best things about silk screening, or screen printing, is that it is not only a form of creative expression, but it is a skill that you can use. What’s more, you can do it in the comfort of your own home, and better yet, you can do it as a family activity for those restless indoor days with the kids.
- 10 Best Ad Networks for Publishers in 2021
- 10 Important Things to Consider When Starting Your New Business Adventure
- 10 Questions to Ask When Choosing a Web Designer for Your Business Website
- 10 Software Tools Every Startup Should Consider
- 10 Tips For Starting A Small Business That You Haven’t Heard
- 12 Ultimate Ways to Make Money